GEORGE NEWS - Never before has an accessory been such an instant global hit. Starting out as quite sterile-looking blue items with simple white trimming, these germ catchers are now manufactured by all and sundry and come in a myriad of shapes, sizes and colours.
You know what I'm talking about - the humble face mask.
This popular accessory has indeed become essential for survival in the months since Covid-19 started spreading across the globe. Though there has been lots of contradictory views about how vital they are to the survival of the general public, (and governmental advice has taken us the full circle) the consensus is that we best wear masks.
Any mask is better than nothing at all when we dare to venture outside our homes.
We are also strongly advised to not buy medical masks which are in short supply, and to leave these for health workers for whom they are truly vital.
That leaves many of us with a dilemma: how to go about making our own masks? With suggestions from the Centers for Disease Control and Prevention (CDC) website, combined with some good old-fashioned experience, I provide you with these ideas:
The disposable kitchen coquette
This simple mask can literally be sourced from everyday items in your kitchen.
- What you need: kitchen paper, rubber bands and a stapler
How to make it: Thoroughly wash or sterilise your hands and the worktop. And the stapler. That was the bulk of the work. Now take out two rubber bands from the packet you bought at the supermarket's stationery section and set them down within reach.
Tear off two or three sheets of paper from your kitchen roll and place them in landscape orientation on the worktop, one on top of the other. Fold all the layers together, into ±3cm wide zig-zag folds, and press down to set the folds. Fold one end over one of the rubber bands and staple the band into place. Repeat on the other side.
Pick up the mask by the rubber bands and hook the bands behind your ears. Carefully pull open the paper folds to cover your nose and mouth.
PS. Have a good flirt - wear false eyelashes and let your eyes do the talking...
The wannabe medical mask
This one is more serious in more than one way. You actually have to go out and buy that stuff dressmakers use to stiffen collars and button strips. Oops, the shops are closed. Well, maybe this is the time to bring out the left over cotton fabric from your child's school revue.
Oh yes, and you will need a sewing machine that you know how to operate.
 Wannabe medical mask STEP 1.
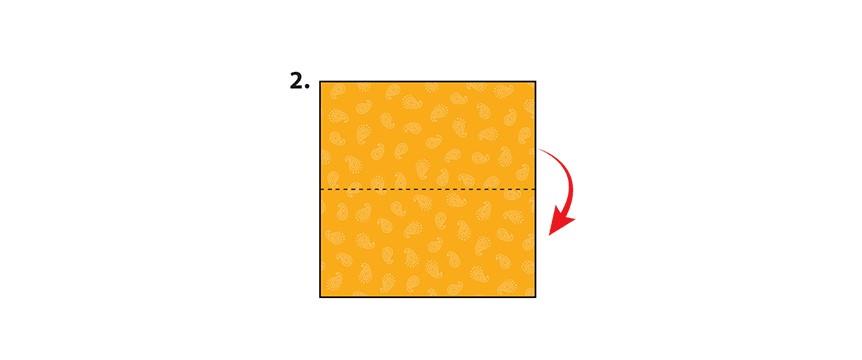
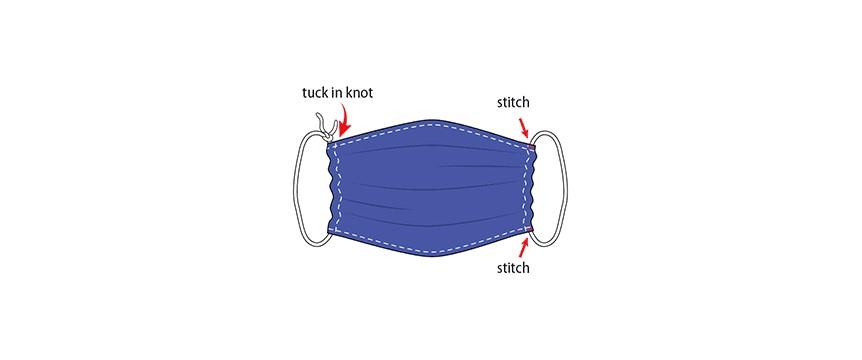 Wannabe medical mask STEP 2.
What you need: The above-mentioned fabric, scissors, some thread and again some elastic, but this time from the supermarket's haberdashery section (8-cord is about the width you're looking for). And disinfectant for the scissors and the sewing machine.
 The wannabe medical mask.
How to make it:
Method A: Cut rectangles [about 26 x 16cm] from the fabric. Put two or three layers on top of each other. If you're using cotton, hem all four sides. Now put it on your sterile worktop, landscape-oriented, and fold into ±3cm wide zig-zag folds. Keep the folds on each side together with a pin or two. Cut two pieces of elastic, about 16 to 18cm long, depending on the size of your head. Push both ends about 1cm into the folded cloth, spacing them at the top and bottom of the 3cm folds, and stitch in place. Take out the pins.
Method B: Cut the fabric as above. Using two or three layers, hem the long sides. Now fold over the short sides and hem down, forming hems wide enough for the elastic. Cut two pieces of elastic about 16 to 18 cm long, depending on the size of your head, thread them through the hems and stitch the ends together to form the ear loops. Gather the sides of the mask closer together and adjust to fit snugly around your face.
PS. You can try the flirty fluttering when you wear this one too, if you want
The washable T-shirt makeshift
I'm sure we all have at least one T-shirt we'll never use again - psychedelic look or cringe-worthy quote... Well, think again - it may just become the most-used item in your wardrobe!
- What you need: The T-shirt, washed as clean as you can get it, a pair of sterilised scissors, two strong rubber bands or hair bands
 T-shirt STEP 1.
How to make it: Cut out a square of ±50cm x 50cm through both layers of the T-shirt. Fold the top and bottom parts towards the middle so that the top and bottom edges meet. Place the two rubber bands over the folded cloth, about 16cm apart. Fold the sides in toward the centre and tuck. The rubber bands go over your ears 'et voila!' - you have the most psychedelic or cringe-worthy mask in town! Plus you can wash it any time you like.
 T-shirt STEP 2.
For more about mask-making click here.
'We bring you the latest George, Garden Route news'